Sunday, December 4, 2011

Another Successful Couponing Trip!

So I posted on facebook the other day that I had made $3 at walgreens and I wanted to share with all of you how I did this. It was actually pretty easy and only required 3 transactions. I was also really happy because I got a chance to get some things that we can really use on a daily basis! So here we go:

Here are the items I got: Airwick air freshener, 2 chewy packages, 1 9oz Dawn.


NOTE: I did go into this trip having $4 Register Rewards from a previous trip. So this is how I made so much money. I tend to save one from the week before so that I can apply it to the next trip. It saves me more in the end.  You can also spend them on other items you need, however I prefer to use them on sale items the following week.  

Transaction #1: Air Wick Freshmatic Odor Detect 


Sale Price: $7.99
Register Rewards: - $4.00 (from the week prior)
Total out of pocket: $4.38 
THEN I got $5.00 Register Rewards back:

Total price: $0.67 made back 


Transaction #2: 2  8ct. Quaker Chewy Bars

Sale Price: 2 for $5.00
Register Rewards: -$5.00 (From previous transaction)
Total out of pocket: $0.00!!! 
THEN I got $2.00 Register Rewards back!

I MADE $2.00!!

Total Price: $2.00 made back

Transaction #3: 9oz. Dawn Liquid Soap

I've written previously about how even though sometimes the really good deals are on the small sizes, that it's still a good deal!! I have about 6 of these 9 oz containers of dawn that I've spent maybe a total of $2 out of pocket on.  They may be small, but they are mighty savings!

Original Price: $1.19
In-store coupon: $0.99 for one
Manufacturer's coupon: -$0.50
Total out of pocket: $0.49! That is a really good deal for dawn!

I love when I can stack store coupons and Manufacturer's coupons, that can give you some great saving!

Altogether I paid $4.38 out of pocket, but I ended up making $3.00 from Register Rewards! That definitely made this trip completely worth it!

Have you ever gotten a great deal on a product? I'd love to hear about it!


Friday, December 2, 2011

Our First Military Ball

Last night, Kendall and I attended our first Military Ball.  I was so excited to be able to dress up as that is something we don't do often (We should do more though!).  The Ball itself was fine, although we ended up leaving early ha.  In our defense, we sat at a table with people we didn't know and by 8:30 they weren't even halfway done with the ceremony part.  So the dancing wouldn't have begun until probably 10! We just don't stay up late anymore, so we ended up heading home.

It was really fun to get some pictures and just to have this time with Kendall :) We invited our friend Elizabeth May from Soldier's Hospitality House to come take our pictures. Here is a highlight from that night!

 Love this one! 

Outtake :)  

I wore this dress for homecoming my junior year of high school. I'm so glad I got to wear it again! 

Don't mind the trash in the yard.  For some reason everyone's trash blows into our backyard.  I picked it all up, but missed that one piece ha.  

 Love this one too!! 

Sitting at the Ball... can you tell I was slightly bored? 

The ceremony hall  

They had a video playing before the ceremony started 

Our salads (These were sitting out for probably 4-5 hours before we got there... kinda gross) 

 mmmm desert! (These were sitting out as well)

My name card.  I know i'm a Mrs.  But it's always weird when I see it in writing! I definitely kept these :) 

Overall the entire night was a fun evening with friends! (We all ended up leaving early) I definitely want to find more reasons to dress up like this.  

What are some of your favorite events to dress up for? 

Photobucket

Thursday, December 1, 2011

{...MMMMMMM...} Strawberry Jam

One of my favorite things to do this fall is to can jams and butters! There is just something about making something from scratch and having it last you for the next several months. I also love the idea of using the foods that the Lord has given us and using them in more creative ways.

I have posted before that I've made strawberry jam, however I didn't actually post HOW I make jam. So I wanted to share this really easy recipe with you!

Strawberry jam is actually one of the easiest things to make. It only requires a few ingredients and (in comparison to other jams and butters i've made) it doesn't take too long.

Strawberry Jam
6 packages of Strawberries 
4-7 cups of white sugar 
2 package of no-sugar pectin 
3 Lemons 
Large stock pot 
Water bath canner (These aren't terribly expensive. I got mine at Target for about $30 and it came with a kit with everything you need.  You can invest more in a canner if you want, but mine works just fine for me.)
about 8-9 1/2-pint jars with fresh lids (If you have old jars around you can definitely use those! Just make sure to purchase fresh flat lids for each can.  You don't want to reuse those because it won't seal properly.)


Step 1: Fill your water bath canner with water (enough that it will be about 1-2 inches above the jars) and put it on high heat, it will take a while to get hot enough. 

Step 2: Cut the strawberries into small pieces.  


Step 3: Take a potato masher or meat masher and mash up the strawberries as much as possible. Then pour the strawberries into the large stock pot. 


Step 4: cut 3 lemons in half and squeeze out as much juice as you can. You can squeeze them into a strainer to avoid the seeds from going into the juice.  Mine made about 1/3 of a cup. 


Step 5: Pour the lemon juice into the strawberries and mix thoroughly (This is to help the strawberries to avoid changing colors after being canned) 


Step 6: Turn the heat on medium and add the package of pectin. Mix thoroughly and bring to a full boil (The kind of boil you can't stir out) 


Step 7: Begin to add the sugar.  Begin with 3 cups and allow to simmer for about 5-10 minutes. Spoon out some jam, allow it to cool and if it stiffens up and becomes the consistency you want, then it is finished. (Also taste it, if it isn't sweet enough add more sugar and allow to cook in a few minutes) (You can also skim off the foam from the top as it boils.  But put it in a bowl, you can still use it as jam on bread! It's really yummy!) 

Note: If the jam isn't thick enough, add more sugar, allow to cook a few minutes and spoon some out again.  You want it to become almost like a gel consistency. 

Step 8: While the jam is cooking, take your 1/2 pint jars and you want to sterilize them.  I found a really easy way to do this while searching the internet one day.  Take the jars, take off the lids, and put them on a baking sheet.  Put them in the oven at 250 degrees for at least 10 minutes.  Once you are ready for them, pull them out of the oven and fill immediately. 

Step 9: Take the flat lids and place them in very warm water to soak until ready to use.  (I put mine on the oven and put it on low)


Step 10: Once the jam is of the correct consistency, take your jars out of the oven and begin to fill them.  Make sure to use the jar "funnel" so you don't make too much of a mess.  Fill the jars so that there is about 1/2 inch at the top for what is called "head" space.  This allows the jar to seal properly. 

Step 11: Use the magnetic lid lifter to take the flat lids out of the very warm water and put them on the jars and close them with the screw on top.  This will hold the lid in place til it seals. 


Step 12: Place your jars into the water in the canner.  Place the lid on top and allow them to sit in the boiling water for about 7 minutes. (You don't start counting the time UNTIL the water begins to boil) 

Step 13: When the time is up, use a hot pad (I prefer the full gloves) and pull out the jars with the handles and hook them over the sides so the bottom of the jars are slightly in the water.  Take the jar gripper and pull out each jar and place it on a towel to cool 


There are two ways to tell that they have sealed properly.
1. You will hear it make a popping sound. That means that the top has popped down and it is sealed. 
2. After it has completely cooled, touch the middle of the lid and if it makes the popping sound it didn't seal. In this case, you can either sterilize a new jar, and re-can it. Or just stick it in the fridge and eat it right away!! (I like the second option :)

You now have yummy homemade jam!! If you have ANY questions let me know and I will do my best to answer them for you! 

What are some of your favorite kinds of jam? 
Photobucket

Wednesday, November 30, 2011

Chicken Alfredo Pizza

Yesterday I posted a recipe for homemade Alfredo Sauce. The other day I really wanted to use this fantastic recipe for some thing new! So I decided to make a Chicken Alfredo Pizza. I had never made this type of pizza before, so I wasn't completely sure how it would turn out.  However, we were pleasantly surprised at how amazing it is! So I wanted to make sure to share this fantastic recipe with all of you.

Chicken Alfredo Pizza
Pizza Crust (I cheated a little bit and used pre-made crust. We have several packages that we got on sale when I first moved and I am trying to get rid of them, however I will be posting a pizza crust recipe in the near future)
1 block of Mozzarella Cheese
1 Chicken breast
Garlic 
Any herbs you enjoy: We used basil and a little rosemary. 

Step 1: Take a medium sized sauce pan and boil some salted water with the chicken already in it. (You want to boil the chicken slowly so that it isn't dry)
Step 2: If you are making Alfredo Sauce from scratch begin cooking that. If not, skip this step. 
Step 3: Once the chicken has been boiling for a few minutes take a knife or some scissors and make sure that it is done in the middle.  Once it is cooked through take it off heat. 
Step 4: Begin Making the Pizza Crust (if you are making it from scratch you should make this at the same time as step 2)
Step 5: Cut the chicken into small chunks
Step 6: Spoon some Alfredo Sauce onto the pizza (The quantity will depend on the size of your pizza. You want to leave about 1 inch on the sides to make sure it doesn't spread off the pizza). Then add the chunks of chicken on top of that. 


Step 7: chop up some garlic (you can always choose to omit this step if you aren't a garlic fan. I though, put garlic in nearly everything!)
Step 8: Sprinkle the cut garlic on top of the chicken and alfredo sauce


Step 9: Grate your cheese. You can make as much cheese as you want.  We like really cheesy pizza so we use at least 1/2 block of cheese if not a whole block.

Step 10: Place your cheese on top of the pizza and put in the oven a 375 (unless your pizza crust says otherwise).
Step 11: Watch the pizza, you want to take it out when the cheese starts to brown ever-so-slightly.

Note: If you are making a thin crust pizza, like I did, really want the time it cooks. Mine took less than 10 minutes until it started to brown.  You don't want things to get over-cooked. 

Enjoy!! As you can see, we were so excited I forgot to take a picture of the whole pizza! So here are the last 2 pieces. 

What is your favorite kind of pizza to eat? 

Photobucket

Wednesday, November 16, 2011

Pinterest || My Latest Addiction

If you haven't had a chance to get onto Pinterest yet, you definitely should check it out!

Pinterest is basically a method of "bookmarking" but with pictures.  You can create different "boards" (or folders) and you "pin" things onto those boards depending on what they are.  I have boards with recipes, decoration ideas, organization, fashion, etc.  It is an amazing way to find creative ways to do every day things or to find a new way to look at the spaces around you!  I have tried some recipes that have become staples in our home and found some great desserts that I will never forget!

Another amazing part of Pinterest is that you aren't limited to the things that other people pin.  You can add a small icon on your bookmark bar and click it to pin anything from another website!  Here is a little tour of Pinterest :)


Pinterest

    When you first get onto the Pinterest website you will see a page that looks like this:

1. The Everything Button:  This button allows you to see a random group of everything that anyone on Pinterest has pinned.  You can also choose based based upon your interests as well.

2. Pinners You Follow: This will take you back to the current screen. This shows you all the pins from anyone that you have chosen to follow.

3. These are the actual "pins" that people have chosen to pin.

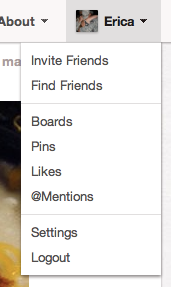
4. See side image: when you click on your name it will bring up this drop-down menu. If you click boards it will take you to a list of all the boards you have chosen to make.  If you click Pins, it will take you to a list of your pins, etc.


The Boards 

 The above image is what you see when you click "boards" on your drop-down menu.  This shows you all the boards that you have chosen to create. As of right now, I have 30 different boards containing 1240 different pins.

If you click on a specific board this is what you will see. It will show you all the Pins that are included within that Board.  These are just two examples of the boards that I have. 


 Pinning on Pinterest
There are two ways to pin something: On Pinterest and Anywhere else on the web. We'll do on Pinterest first:

This is the "pin" screen.  This basically gives you more information on the pin as well as a chance to do more with that pin.

1. This is the website that this specific pin came from. If you click that link it will take you to the blog post or website that is specific to this pin. So in this case, it would take you to the link for that specific recipe.

2. This is the board that it is currently under, this could be a board you made (if you have pinned this item) or a board that someone else has made.  If you click that area it will take you to that entire board.

3. If it's a board someone else has made and you really like it you can chose to "follow" that board. That will make any pins put into that board appear on the "People You Follow" page.

4. If this is something you really like and want to "repin" you can click that button and a menu will appear. This menu gives you the option to chose what board you want to put it on and to describe the pin. (see below)

5. If you don't want to repin something but you do want to show that you like it, you can click the like button. This will simply put it on a like page and show the other person that you like it, very similarly to Facebook.

This is the Repin screen where you can choose what board it will go into and how you want to describe it.

 Pinning Everywhere Else! 

This is the best feature I think.  If you are on a food blog and you really want to remember this recipe or you see a picture and you want to save that picture to see later, simply click the little world icon in the red square above (you have to download this from Pinterest).

Once you click the world icon you will see a page that brings up every (recognizable) image on this website. Simply choose the one you like the most and then hit "Pin This"


This screen is very similar to the one on e website. You will pick your board and describe the pin and it will automatically put it on Pinterest for you!

This is definitely one of my favorite websites out there right now!

If you are already on it, what are some of your favorite pins? Please share them below! 


Photobucket


Tuesday, November 15, 2011

How to refill the Swiffer Wet Jet!

So I was on pinterest the other day and I found this awesome video on how to open the bottle of a Swiffer Wet Jet so that you don't have to always buy a new one! This is a great thing because it will save significant amounts of money in the future! I filled mine with homemade lysol solution.


Do you have any creative ways that you save money on a daily basis?  Leave some in the comments!

Photobucket


09 10 11 12
Blogging tips